A little euphonium bling is a good thing. Horn dorn! : )
Posted: Sat May 19, 2012 9:37 pm
Thought this fun and rather involved project wold be interesting. A few pics and some details on the project, enjoy.
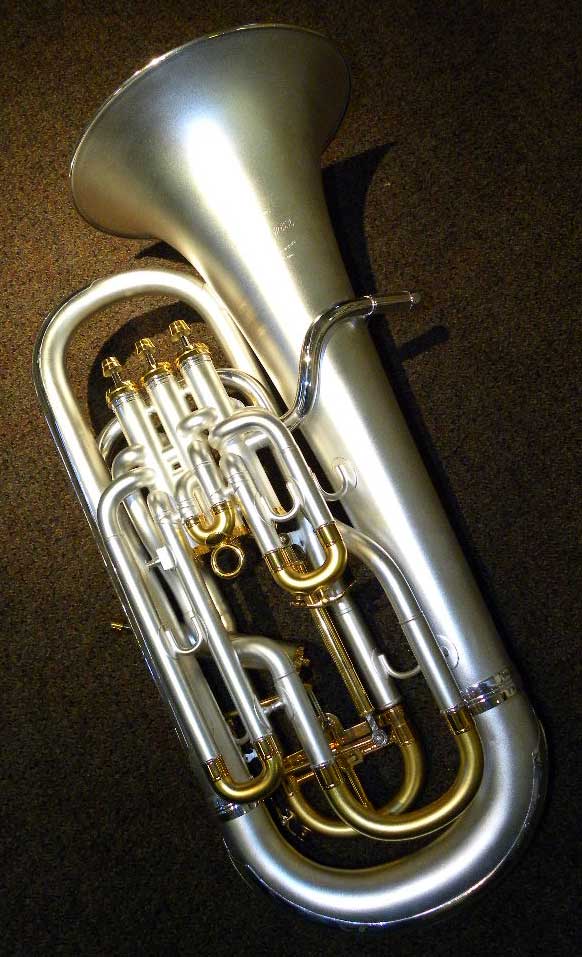
A while back a friend and customer of many years sent me a late 60s Besson ''New Standard'' model euphonium for a little TLC. He had purchased it off eBay and really enjoyed the way it played. The only set back was the typical couple of sharp (but manageable) notes in the upper register and its slightly tattered state. Dennis (the owner) always wanted a tricked out horn for himself and so he asked me if I would restore the horn and do the additional gold plating on the caps, buttons, slides, bell interior, etc. This plating of simple removable parts is what I have always referred to in my shop as ''the cat house special'' I tend to avoid such finishes as I often find them a bit gaudy but in this case I thought it would look fine, and as you can see in the pic below, it turned out just so. A little ''bling'' now and then is okay I guess...
...but then Dennis asked that I instal a kicker device for the master tuning slide; I thought, okay, I have done it before and there are off the shelf parts available that should work just fine with a little persuading. I thought the tuning-slide length might pose a little trouble but I was sure I could deliver. Then Dennis dropped the bomb; he wanted the lever under the forth valve button and not on the front protruding through the third slide as is typically employed on todays high-end models. I then thought whoops! thats different. Because of the limited tuning-slide length on this horn, I knew the lever throw would be an issue as would be the manual tuning adjustment. I also knew that because of the torque on the lever, the powering of the slide return might very well be impossible with the more conventional spiral wound lever-spring.
All this thinking made my head hurt, so I decided to (after having a drink) completely change the design by employing a stretching coil spring that pulls at the fulcrum of the lever as oppose to the typical spiral wound lever spring set up that pushes. This type of spring is delicate and collects dirt and on top of that I don't like the look. So, I chose to design a way to encase the spring and mechanically affix it to the device and then to the instrument using Uniball connectors. See pic below.
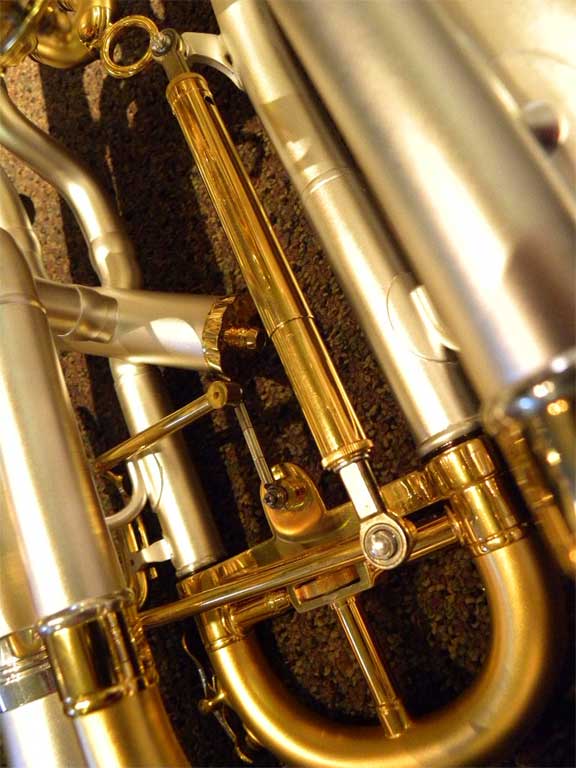
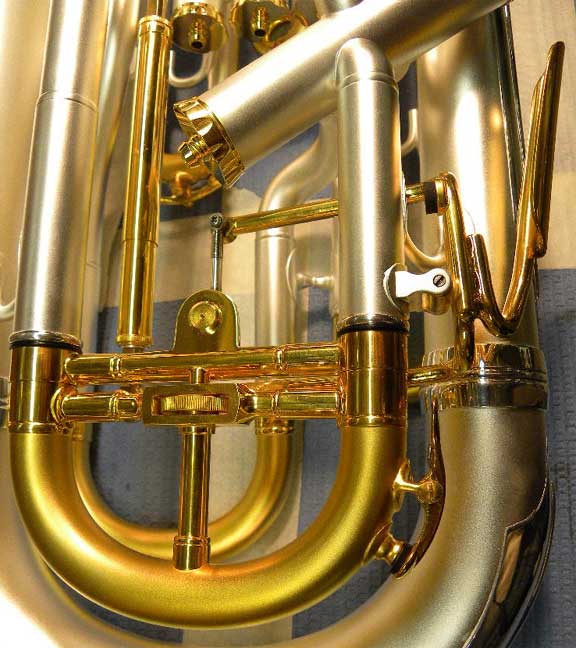
On the other end of the fulcrum, the lever (when released) pulls the slide up and in and is attached with the smaller Mini-ball connectors. The kicker lever has a full controlled throw without the need for a governor device. This is possible because I redesigned the master slide and fabricated the proper tubing and braces, making it double-telescopic with two sets of dependent slides within each other. The outer slide being manipulated by the ''kicker'' the inside being the manual slide that is operated via the fine tuning adjustment wheel; seen in the yoke of the master tuning slide brace. Once all this was figured out, the calibrating of the slides was done only to discover what I had feared, that the bracing of the slides was not able to hold everything in the proper orientation. With only the slightest of flex, the whole device failed to function. So after a bit of staring at the wall, thinking about how an I-beam works, I came up with a simple enough bracing pattern that stabilized the assembly and got it working as I had planned.
With all the gold to be done, after all the dreaming up of designs and machining of parts, I thought it would look good having my additional handy work in gold as well. I think it turned kind of neat. Dennis did too.
Daniel C. Oberloh
Oberloh Woodwind and Brass Works
http://www.oberloh.com
A while back a friend and customer of many years sent me a late 60s Besson ''New Standard'' model euphonium for a little TLC. He had purchased it off eBay and really enjoyed the way it played. The only set back was the typical couple of sharp (but manageable) notes in the upper register and its slightly tattered state. Dennis (the owner) always wanted a tricked out horn for himself and so he asked me if I would restore the horn and do the additional gold plating on the caps, buttons, slides, bell interior, etc. This plating of simple removable parts is what I have always referred to in my shop as ''the cat house special'' I tend to avoid such finishes as I often find them a bit gaudy but in this case I thought it would look fine, and as you can see in the pic below, it turned out just so. A little ''bling'' now and then is okay I guess...
...but then Dennis asked that I instal a kicker device for the master tuning slide; I thought, okay, I have done it before and there are off the shelf parts available that should work just fine with a little persuading. I thought the tuning-slide length might pose a little trouble but I was sure I could deliver. Then Dennis dropped the bomb; he wanted the lever under the forth valve button and not on the front protruding through the third slide as is typically employed on todays high-end models. I then thought whoops! thats different. Because of the limited tuning-slide length on this horn, I knew the lever throw would be an issue as would be the manual tuning adjustment. I also knew that because of the torque on the lever, the powering of the slide return might very well be impossible with the more conventional spiral wound lever-spring.
All this thinking made my head hurt, so I decided to (after having a drink) completely change the design by employing a stretching coil spring that pulls at the fulcrum of the lever as oppose to the typical spiral wound lever spring set up that pushes. This type of spring is delicate and collects dirt and on top of that I don't like the look. So, I chose to design a way to encase the spring and mechanically affix it to the device and then to the instrument using Uniball connectors. See pic below.
On the other end of the fulcrum, the lever (when released) pulls the slide up and in and is attached with the smaller Mini-ball connectors. The kicker lever has a full controlled throw without the need for a governor device. This is possible because I redesigned the master slide and fabricated the proper tubing and braces, making it double-telescopic with two sets of dependent slides within each other. The outer slide being manipulated by the ''kicker'' the inside being the manual slide that is operated via the fine tuning adjustment wheel; seen in the yoke of the master tuning slide brace. Once all this was figured out, the calibrating of the slides was done only to discover what I had feared, that the bracing of the slides was not able to hold everything in the proper orientation. With only the slightest of flex, the whole device failed to function. So after a bit of staring at the wall, thinking about how an I-beam works, I came up with a simple enough bracing pattern that stabilized the assembly and got it working as I had planned.
With all the gold to be done, after all the dreaming up of designs and machining of parts, I thought it would look good having my additional handy work in gold as well. I think it turned kind of neat. Dennis did too.
Daniel C. Oberloh
Oberloh Woodwind and Brass Works
http://www.oberloh.com