The rebirth of a Holton 345 has started...
- Bandmaster
- 4 valves
- Posts: 778
- Joined: Sat May 15, 2004 3:33 am
- Location: Upland, CA
- Contact:
The rebirth of a Holton 345 has started...
Last September I drive my Holton 345 up to Seattle and gave it to Dan Oberloh so he could work his magic on it. (See my avatar) A few weeks ago he told me he finally started working on a whole bunch of tubas that have waiting in line at his shop. He sent me some photos of his progress so far. This horn was not in the best of shape. It had numerous patches all over it. But Dan has assured me it will be better than new when he is done. Seeing examples of his work, I can't wait to get it back later this year.
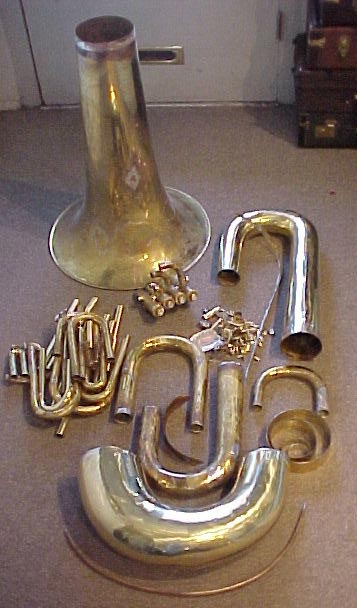
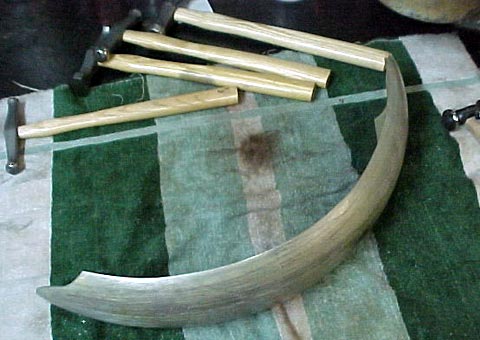
For right now, a nice pile of parts....
Dave Schaafsma
1966 Holton 345 | 1955 York-Master | 1939 York 716 | 1940 York 702 | 1968 Besson 226 | 1962 Miraphone 186 | 1967 Olds | 1923 Keefer EEb | 1895 Conn Eb | 1927 Conn 38K | 1919 Martin Helicon
- Bandmaster
- 4 valves
- Posts: 778
- Joined: Sat May 15, 2004 3:33 am
- Location: Upland, CA
- Contact:
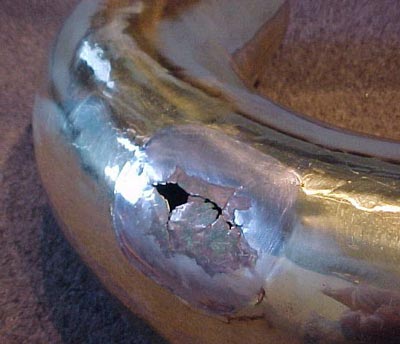
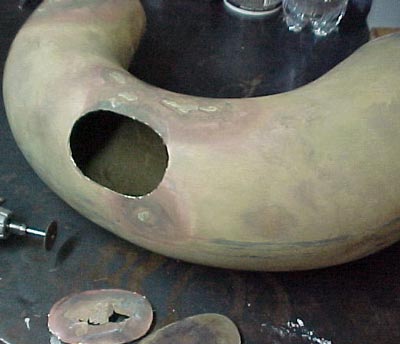
You mean this hole?harold wrote:Dave,
I saw your horn yesterday and Dan pulled the patch off of the back side of the lower bow.
There is a hole there big enough to push a nickel through - truly an impressive hole.
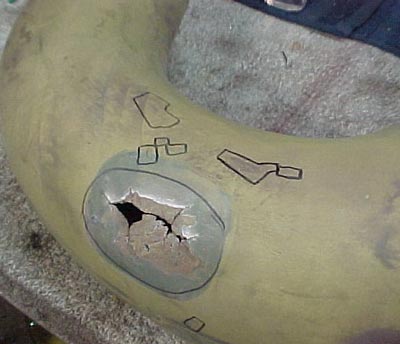
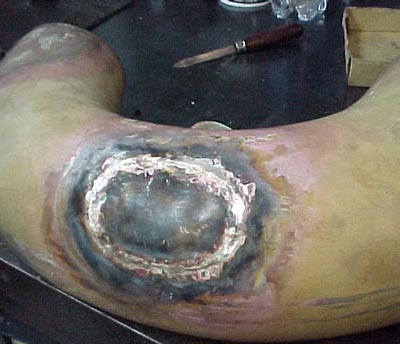
He is going to do an inlay on it and then have it coppered and sanded a few times to build up the material and to smooth out the surface.
What, he didn't show you this hole in the top branch?
Lucky for me that 22 of the 27 patches were on the bell!
harold wrote:He also told me the plan is to make some bow caps for it as well.
I'm certain that it is going to be an impressive bill once he gets done, but you are going to have an incredible instrument - you lucky dog!
Dan said it would be around $5000, but that was before we got the new bell. He was figuring about a grand to repair the original bell. The bow caps he plans to make will add a little to the bill. But I gave him two clarinets, a tenor sax, a beat up BBb Miraphone 186 so he rebuild them to resell, and the Olds double rotor bass t-bone that he has for sale on his site now. So hopefully these should bring the bill down just a hair.
Dave Schaafsma
1966 Holton 345 | 1955 York-Master | 1939 York 716 | 1940 York 702 | 1968 Besson 226 | 1962 Miraphone 186 | 1967 Olds | 1923 Keefer EEb | 1895 Conn Eb | 1927 Conn 38K | 1919 Martin Helicon
- Bandmaster
- 4 valves
- Posts: 778
- Joined: Sat May 15, 2004 3:33 am
- Location: Upland, CA
- Contact:
No more hole!
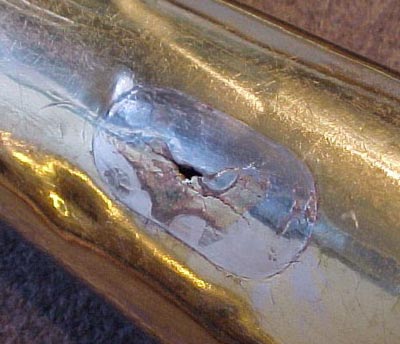
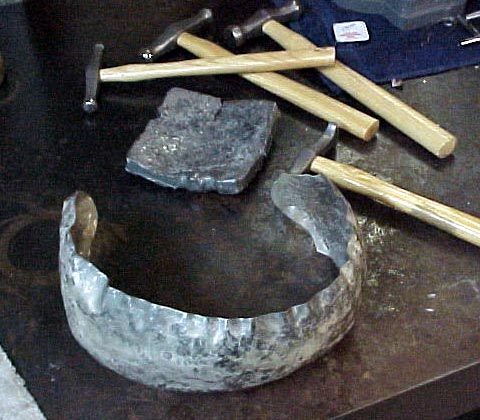
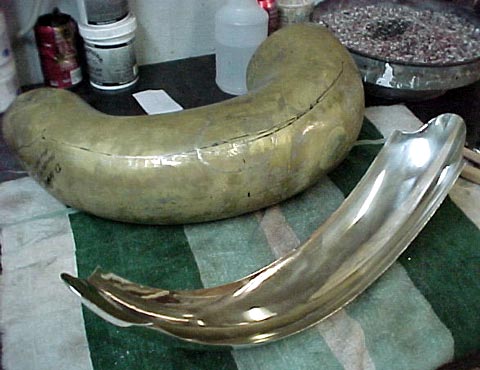
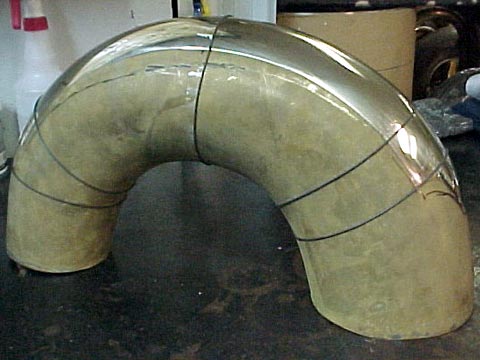
Dan just sent the photos of the repair of the above hole. First he reshaped the bow and removed all the dents, then brazed up the cracks. Then:Bandmaster wrote:You mean this hole?
Next he is going to have it copper plated to build up the surface so he can finish smoothing it out.
So it is one step closer to being done. I can't wait.
Dave Schaafsma
1966 Holton 345 | 1955 York-Master | 1939 York 716 | 1940 York 702 | 1968 Besson 226 | 1962 Miraphone 186 | 1967 Olds | 1923 Keefer EEb | 1895 Conn Eb | 1927 Conn 38K | 1919 Martin Helicon
- Daniel C. Oberloh
- pro musician
- Posts: 547
- Joined: Fri Mar 19, 2004 9:22 pm
- Location: Seattle Washington
I sure dig that helicon Joe. The way you went about that fifth valve is really something (a good deal of effort to be sure). Mirafone rotor? Heyyy, what is with the modern German parts on an antique America horn? But seriously, the "macaroni work" looks great and not at all out of place, nice addition to such a novel instrument.
The work performed on the bottom bow of the 345 (after disassembly) consisted of as follows:
-rough out all of the major dent
-acid wash in a hydrochloric and water bath
-hard-buff/polish
-anneal bow entirely (dead soft)
-press and smooth bow on the dent machine
-reround bow with rounding rings
-locate and grind out all of the stress cracks and corroded areas,
-silver braze ground out areas, bathe in pickling bath, hammer and file brazed areas smooth
-fabricate patch (compound curve) shape to area of bow to be applied
-outline and cut out the hole where the inlay patch is to be placed
-fashion hole and patch to close, proper fit
-silver braze and back into pickle bath
-hammer and file inlay seems
-rounding rings again
-smooth/press area of repair on the dent machine
-sand bow completely on tube sander
-one more going over on the dent machine followed up with one more hydrochloric acid and water wash
-wash in soap and water followed up with good going over with scotch-bright.
The whole process start to finish, began at 7:30 pm and was completed at 1:00 am. Five and a half hours is not bad. I will probably take a little more time then that to do the top bow. I have a couple Hirsbrunner bows to prepare and a bow cap to fabricat over the next few weeks and then I will take the branches down and copper them up. they will probably need two plate jobs with prep work in between possibly three but when completed they should be as close to perfect as can be expected. I hope.
Daniel C. Oberloh
Oberloh Woodwind and Brass Works
www.oberloh.com
- Daniel C. Oberloh
- pro musician
- Posts: 547
- Joined: Fri Mar 19, 2004 9:22 pm
- Location: Seattle Washington
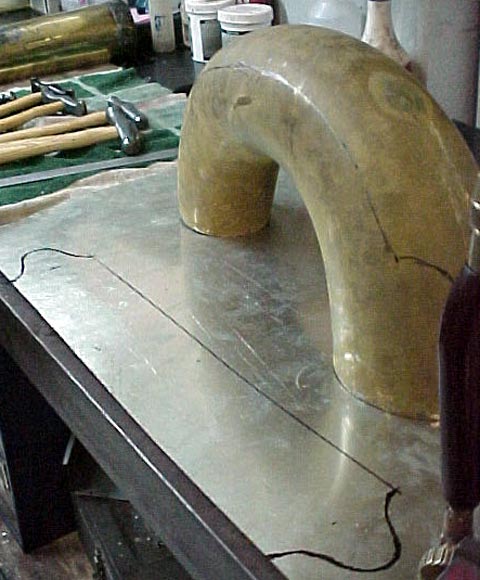
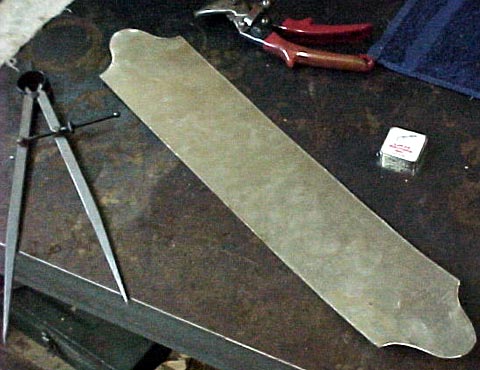
Actually, you can start over, just get two 24''x18'' sheets of 22 gage brass, your best and largest metal forming hammers, torch, etc. and make a new bottom bow.-- Unlike my curly-que piece that I made for the 5th valve tubing on my helicon, you couldn't simply "start over" if you had really screwed up that patch-in braze repair.
Its been done before but this repair is more simple if done with care.
Daniel C. Oberloh
Oberloh Woodwind and Brass Works
www.oberloh.com
- Chuck(G)
- 6 valves
- Posts: 5676
- Joined: Fri Mar 19, 2004 12:48 am
- Location: Not out of the woods yet.
- Contact:
Dan, you're the brass genius here and maybe you can provide an answer to something I've wondered about.
I see the motorcycle and antique auto crowd reproducing shapes that are quite a bit more complex than a tuba bottom bow using English Wheeling, albeit in steel and aluminum and not brass.
Would English wheeling be another way to reproduce the contours in a bottom bow?
I see the motorcycle and antique auto crowd reproducing shapes that are quite a bit more complex than a tuba bottom bow using English Wheeling, albeit in steel and aluminum and not brass.
Would English wheeling be another way to reproduce the contours in a bottom bow?
- Chuck(G)
- 6 valves
- Posts: 5676
- Joined: Fri Mar 19, 2004 12:48 am
- Location: Not out of the woods yet.
- Contact:
- Daniel C. Oberloh
- pro musician
- Posts: 547
- Joined: Fri Mar 19, 2004 9:22 pm
- Location: Seattle Washington
Chuck,
One tool that is sort of like the English-wheel would be the typical dent machine which works great on shaping and smoothing bows. It is much more complex then an English-wheel and does not really opperate on the same principals but is has it's application. However, for making or restoring damaged guard moldings this is the tool for the job. You still need to know how to stretch, hammer and pre-form the sheet brass before taking it to this puppy but it sure makes the job alot less strenous.
Best regards,
Daniel C. Oberloh
Oberloh Woodwind and Brass Works
Seattle, WA
206.241.5767
www.oberloh.com
- Daniel C. Oberloh
- pro musician
- Posts: 547
- Joined: Fri Mar 19, 2004 9:22 pm
- Location: Seattle Washington
Some times I receive instruments for restoration that have brass that has been worked to a point where the metal is so hard that the stiffness make it difficult or impossible to work with. The large bows and bell of this tuba were work hardened so much so that they had quite a few cracks, some eventually got to the point that large pieces of metal had fallen out. Annealing is the the term for softening metal through the use of heat. Using a very large gas torch, I brought the complete bow up to temperature where it (the brass) was a dull cherry red. This will change the grain structure of the brass in such a way that it allows the metal to relax and become more malleable. After allowing it to air cool for a minute or so, it is finally quenched in an acid solution to remove fire scale that forms on the surface of the metal during the annealing process. The brass is now soft enough to make the needed corrections. If done properly the hand working of the metal will stiffen up the brass and because it was annealed the cracking problem should now stop.
Daniel C. Oberloh
Oberloh Woodwind and Brass Works
www.oberloh.com
Daniel C. Oberloh
Oberloh Woodwind and Brass Works
www.oberloh.com
- Rick Denney
- Resident Genius
- Posts: 6650
- Joined: Mon Mar 22, 2004 1:18 am
- Contact:
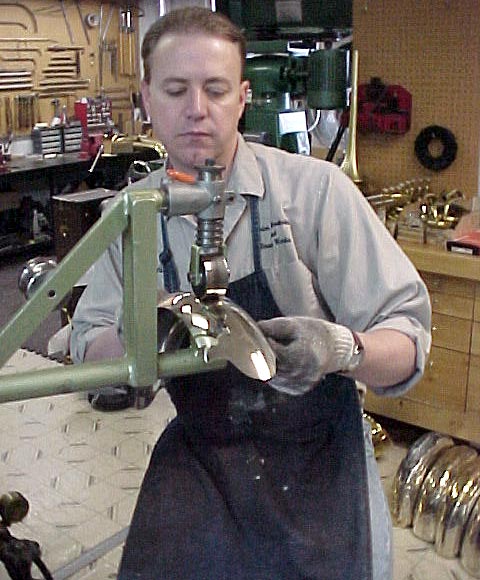
Webster got it basically right: to heat and then cool (as steel or glass) usually for softening and making less brittle; also : to cool slowly usually in a furnace.harold wrote:What exactly does this mean? Is there an industry standard definition of annealing? How long does it take and how do you know when you are done?-anneal bow entirely (dead soft)
Heating normal yellow brass (20% zinc) to about 400 degrees C will get most of what there is to get from annealing, if you keep it hot long enough for the molecules to sort themselves back into what's called "solid solution". Hotter works, too, and most heat to cherry red. Note that if the material is stressed very much at all, it will deform or collapse when this hot. Once the material is uniformly that hot and has been so for a while, you can cool it in water without losing the regrowth. Unlike steel and glass (which was the basis for Webster's definitions), brass is quenched in water (or, as I now see from Dan's response, a water-based acid; steel is often quenched in oil to slow down the cooling) during annealing.
When you cold-work brass (i.e., hammer, roll, peen, etc.), you crush the grain structure into a confused debris that becomes stronger in the way that a jigsaw puzzle is stronger with interlocking pieces than with pieces that do not interlock. Annealing melts the grains and allows them to recrystallize, restoring the material to its basic solid-solution properties. Cold-working can just about double the hardness of brass.
In the case of Dan's bottom bow, annealing it after brazing in the patch does two things. One is that it relieves the internal stresses resulting from the brazing (which spot anneals it at the brazing site and also creates thermal stresses), and the second is that it improves the state of the braze material, which usually has more zinc than the base brass and can therefore be more brittle. The bow will get stronger again as he works it further.
There is no industry standard for annealing, and the technique something that has to be learned. There is a standard for "fully annealed" which is basically cast molten brass. As soon as you shape it, it gets harder. The larger the grain structure, the closer to fully annealed you are.
Rick "who won't get into alpha, beta, and gamma brass states" Denney
- Rick Denney
- Resident Genius
- Posts: 6650
- Joined: Mon Mar 22, 2004 1:18 am
- Contact:
Dan is right--I didn't read his description carefully enough. I was explaining why he would anneal the brazing, not that it necessarily needed to be annealed. Annealing is always done to remove the work hardening so that the material is no longer brittle and can be worked more without cracking. Welds are often annealed to soften the material uniformly through the patch, but quenching the weld itself would probably accomplish that (I was thinking steel and aluminum where you don't quench after welding or annealing).harold wrote:Dan says that he annealed it BEFORE putting the patch in place and Rick is suggesting that it needs to be annealed AFTER the patch was braised into place.
...
What is "fire scale"? Where does it come from? is it a byproduct of the heat and the brass? Aren't you loosing material (i.e. brass) in this fire scale?
Fire scale is the burned dirt, flux, grease, and other stuff on the brass that creates oxidation when heated to red-hot temperatures. Also, any impurities in the brass will contribute to the formation of scale during heating if you get it hot enough. When I have ordered tubing bits for Miraphones, they have always come black, and that black coating is evidence that it was annealed.
Rick "who, as usual, went too far with the explanation" Denney
- Bandmaster
- 4 valves
- Posts: 778
- Joined: Sat May 15, 2004 3:33 am
- Location: Upland, CA
- Contact:
Another round of photos...
OK, here we go again. Dan just sent me another round of photos. This time he made a new bow cap for the bottom bow, since it was missing from my horn. So here's how it goes:
Dan says....
1. The first is the sheet of nickel-silver with the outline of the blank.
2. This is the blank after it was cut out.
3. Annealing the blank.
4. Roughing out the molding blank using a number of special hammers and a lead block.
5. smoothing and additional shaping.
6. More annealing to soften the metal and allow for more shaping.
7. Pickling removes the fire-scale after annealing.
8. After pickling the part is polished and ready for more shaping.
9. Using a special tool for the job of shaping and smoothing.
10. Fit is close but still needs a little more tweeking. I will need to do a little more fine tuning but should have the guard completed soon.
Thanks Dan, you're doing a fabulous job!
Dave Schaafsma
1966 Holton 345 | 1955 York-Master | 1939 York 716 | 1940 York 702 | 1968 Besson 226 | 1962 Miraphone 186 | 1967 Olds | 1923 Keefer EEb | 1895 Conn Eb | 1927 Conn 38K | 1919 Martin Helicon
- windshieldbug
- Once got the "hand" as a cue
- Posts: 11512
- Joined: Tue Mar 01, 2005 4:41 pm
- Location: 8vb
- Bandmaster
- 4 valves
- Posts: 778
- Joined: Sat May 15, 2004 3:33 am
- Location: Upland, CA
- Contact:
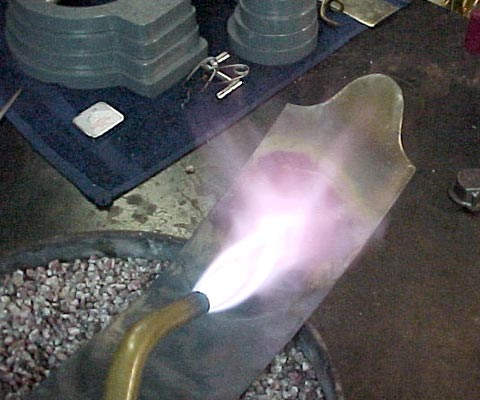
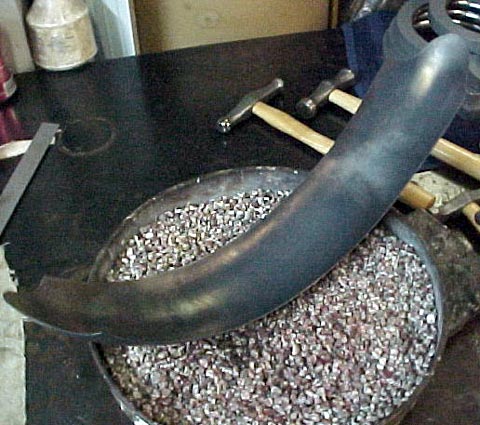
This is what Dan calls "pickling". If I remember right, the acid solution is hydrochloric acid diluted in water. But I am not sure what concentration he makes it.Daniel C. Oberloh wrote:After allowing it to air cool for a minute or so, it is finally quenched in an acid solution to remove fire scale that forms on the surface of the metal during the annealing process.
Dave Schaafsma
1966 Holton 345 | 1955 York-Master | 1939 York 716 | 1940 York 702 | 1968 Besson 226 | 1962 Miraphone 186 | 1967 Olds | 1923 Keefer EEb | 1895 Conn Eb | 1927 Conn 38K | 1919 Martin Helicon
- Daniel C. Oberloh
- pro musician
- Posts: 547
- Joined: Fri Mar 19, 2004 9:22 pm
- Location: Seattle Washington
Sulfuric acid is more commonly used. I like to use hydrochloric, one part to 15 parts water. The copper alloy parts are immersed when still quite hot (400-500oF). Hot immersion with a ten minute soak is very effective at removing fire scale. Pickling is also very good fore removal of borax flux used in silver brazing.
Daniel C. Oberloh
Oberloh Woodwind and BRass Works
www.oberloh.com
Daniel C. Oberloh
Oberloh Woodwind and BRass Works
www.oberloh.com