The rebirth of a Holton 345 has started...
-
Chuck(G)

- 6 valves

- Posts: 5679
- Joined: Fri Mar 19, 2004 12:48 am
- Location: Not out of the woods yet.
- Contact:
-
Daniel C. Oberloh

- pro musician

- Posts: 547
- Joined: Fri Mar 19, 2004 9:22 pm
- Location: Seattle Washington
-
Chuck(G)
- 6 valves
- Posts: 5679
- Joined: Fri Mar 19, 2004 12:48 am
- Location: Not out of the woods yet.
- Contact:
-
Daniel C. Oberloh
- pro musician
- Posts: 547
- Joined: Fri Mar 19, 2004 9:22 pm
- Location: Seattle Washington
Chuck, your suggestion sounds like an interesting application.
I don't know if you have ever done this kind of work but hammers are very effective and are as quick as the operator using them. The process I employ is not as physically difficult as is the knowing where and when to strike the metal and with which hammer to use and how hard to swing it. I could hammer on a piece of sheet metal for a very long time but without understanding what approach to take at the end of the day I would have nothing more to show for my labors then a very bent up piece of nickel-silver. The way I go about making moldings and many other parts is not super hard, it is just like so much that is involved in brass instrument work, it takes skill and knowledge. Its all in knowing how to shape the part that is demanding.
Daniel C. Oberloh
-
Bandmaster

- 4 valves

- Posts: 778
- Joined: Sat May 15, 2004 3:33 am
- Location: Upland, CA
- Contact:
Re: The rebirth of a Holton 345 has started...
Glad to hear that he has started on your Holton too. Where are the photos????harold wrote:I spent the better part of this evening taking my Holton 345 apart with Dan's assistance. It took several hours with a fair amount of time spent cleaning old soldier off of all the joints.
Someone suggested this can be done in less than 2 hours. I would gladly pay you the two hours of labor if you would have done it for me. It isn't just the labor - it is the sheer epic vastness of the size of these horns that makes working on them so difficult.
I was talking to Dan on the phone Wedneday night last week while he was working on my valve section. He was cutting the tops out of the valves on the lathe and making the new inserts to press into the top of the valves. He was hoping to get them over to the platers this week. Did you have a chance to see how far he got with my horn? Hopefully he is almost done with my valves. Just maybe it will start going back together soon.
Dave Schaafsma

1966 Holton 345 | 1955 York-Master | 1939 York 716 | 1940 York 702 | 1968 Besson 226 | 1962 Miraphone 186 | 1967 Olds | 1923 Keefer EEb | 1895 Conn Eb | 1927 Conn 38K | 1919 Martin Helicon
1966 Holton 345 | 1955 York-Master | 1939 York 716 | 1940 York 702 | 1968 Besson 226 | 1962 Miraphone 186 | 1967 Olds | 1923 Keefer EEb | 1895 Conn Eb | 1927 Conn 38K | 1919 Martin Helicon
-
Bandmaster
- 4 valves
- Posts: 778
- Joined: Sat May 15, 2004 3:33 am
- Location: Upland, CA
- Contact:
Hey, hey, hey!!!
Hey guys.... we're talking about Holtons here! 
No fair hi-jacking my thread and boozing it up! I intend to keep adding to this thread as work progresses on my horn, so don't muck it up too bad, will ya!
No fair hi-jacking my thread and boozing it up!
Dave Schaafsma
1966 Holton 345 | 1955 York-Master | 1939 York 716 | 1940 York 702 | 1968 Besson 226 | 1962 Miraphone 186 | 1967 Olds | 1923 Keefer EEb | 1895 Conn Eb | 1927 Conn 38K | 1919 Martin Helicon
1966 Holton 345 | 1955 York-Master | 1939 York 716 | 1940 York 702 | 1968 Besson 226 | 1962 Miraphone 186 | 1967 Olds | 1923 Keefer EEb | 1895 Conn Eb | 1927 Conn 38K | 1919 Martin Helicon
-
Daniel C. Oberloh
- pro musician
- Posts: 547
- Joined: Fri Mar 19, 2004 9:22 pm
- Location: Seattle Washington
Dave- (and you lot of boozers!) 
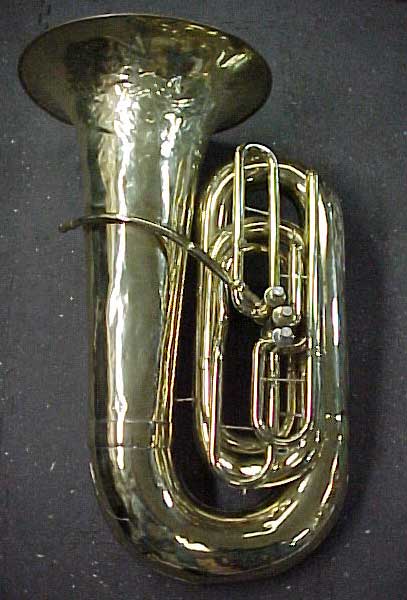
Things are moving forward with your valves, Fore the past number of weeks, I have been sidelined by the french horn from hell but have been working at yours and Dales horns when time permits. I will share a few images with you soon, probably posting them here in the next day or so. Yes, Harold has a horn in the shop that is being squared away as well but I try to have him work on the tear-down and clean up. If it make you feel better, he has burned his "piddys" more the once while handling the fire wrench. It is a 340 that we will be putting in a new valve assembly. Here is an image of it before the tear-down started.
Daniel C. Oberloh
Oberloh Woodwind and Brass Works
Seattle, WA
206.241.5767
www.oberloh.com
Things are moving forward with your valves, Fore the past number of weeks, I have been sidelined by the french horn from hell but have been working at yours and Dales horns when time permits. I will share a few images with you soon, probably posting them here in the next day or so. Yes, Harold has a horn in the shop that is being squared away as well but I try to have him work on the tear-down and clean up. If it make you feel better, he has burned his "piddys" more the once while handling the fire wrench.
Daniel C. Oberloh
Oberloh Woodwind and Brass Works
Seattle, WA
206.241.5767
www.oberloh.com
-
Bandmaster
- 4 valves
- Posts: 778
- Joined: Sat May 15, 2004 3:33 am
- Location: Upland, CA
- Contact:
Cool...Daniel C. Oberloh wrote:It is a 340 that we will be putting in a new valve assembly. Here is an image of it before the tear-down started.
Dave Schaafsma
1966 Holton 345 | 1955 York-Master | 1939 York 716 | 1940 York 702 | 1968 Besson 226 | 1962 Miraphone 186 | 1967 Olds | 1923 Keefer EEb | 1895 Conn Eb | 1927 Conn 38K | 1919 Martin Helicon
1966 Holton 345 | 1955 York-Master | 1939 York 716 | 1940 York 702 | 1968 Besson 226 | 1962 Miraphone 186 | 1967 Olds | 1923 Keefer EEb | 1895 Conn Eb | 1927 Conn 38K | 1919 Martin Helicon
-
Daniel C. Oberloh
- pro musician
- Posts: 547
- Joined: Fri Mar 19, 2004 9:22 pm
- Location: Seattle Washington
Well, I managed to get a few images of Dave's Holton tuba pistons. Here are a few shots. after I stripped the nickel plate (chemically), they were ready to be converted to the nylon screw-in guide that works so much quieter. The piston tops were bored out, new ones fabricated and installed in addition to a few other small modifications, I will also be replacing the valve stems with a more robust set that will be custom made as the originals were not as sturdy as would have been preferred. If any readers are interested in seeing more of what is involved in this post, I did throw together a photo essay that goes into more detail. I hope you don't mind the length of what I have added here.
http://www.oberloh.com/gallery/tubavalvereferbish.htm
After the pistons have had there tops replaced, they are ready to be machined further.
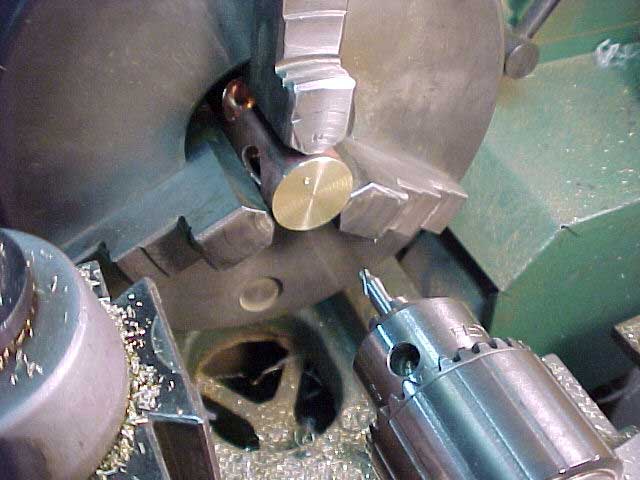
Tops numbered and chucked up in the engine lathe.

Drilling with a centering bit the guide hole for the valve stem.
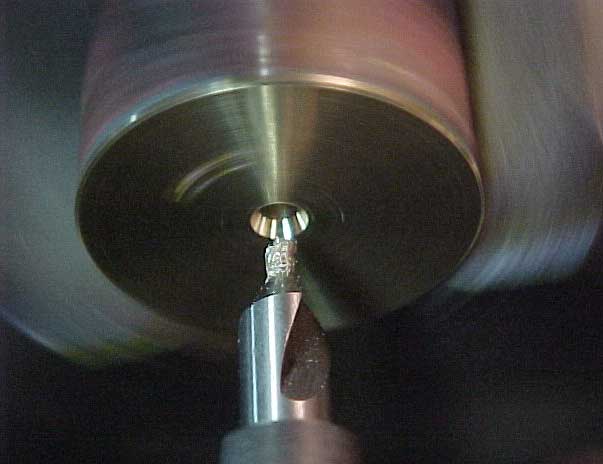
Clean guide hole, ready to drill.
Drilling
Having been counter-bored, the threads are tapped.
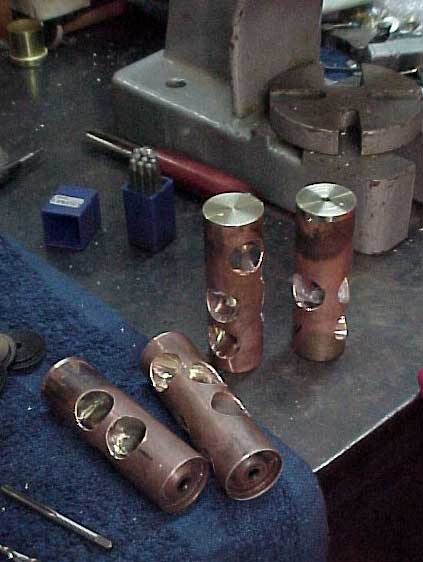
Three pistons had damage to the top ports that had to be corrected by grinding solder and then smoothed with a dye-grinder.
All repairs and alterations made, the pistons shown are ready to proceed on to plating and final sizing to the respective cylinders.
I still have a way to go with repairs to the top threds of the valve cylinder casings and will attempt to share images, if you all are interested?
Daniel C. Oberloh
Oberloh Woodwind and Brass Works
Seattle Wa.
http://www.oberloh.com/gallery/tubavalvereferbish.htm
After the pistons have had there tops replaced, they are ready to be machined further.
Tops numbered and chucked up in the engine lathe.
Drilling with a centering bit the guide hole for the valve stem.
Clean guide hole, ready to drill.
Drilling
Having been counter-bored, the threads are tapped.
Three pistons had damage to the top ports that had to be corrected by grinding solder and then smoothed with a dye-grinder.
All repairs and alterations made, the pistons shown are ready to proceed on to plating and final sizing to the respective cylinders.
I still have a way to go with repairs to the top threds of the valve cylinder casings and will attempt to share images, if you all are interested?
Daniel C. Oberloh
Oberloh Woodwind and Brass Works
Seattle Wa.
-
Bandmaster
- 4 valves
- Posts: 778
- Joined: Sat May 15, 2004 3:33 am
- Location: Upland, CA
- Contact:
Interested????Daniel C. Oberloh wrote:I still have a way to go with repairs to the top threds of the valve cylinder casings and will attempt to share images, if you all are interested?
Dave Schaafsma
1966 Holton 345 | 1955 York-Master | 1939 York 716 | 1940 York 702 | 1968 Besson 226 | 1962 Miraphone 186 | 1967 Olds | 1923 Keefer EEb | 1895 Conn Eb | 1927 Conn 38K | 1919 Martin Helicon
1966 Holton 345 | 1955 York-Master | 1939 York 716 | 1940 York 702 | 1968 Besson 226 | 1962 Miraphone 186 | 1967 Olds | 1923 Keefer EEb | 1895 Conn Eb | 1927 Conn 38K | 1919 Martin Helicon
-
tofu
- 5 valves

- Posts: 1998
- Joined: Sun Mar 21, 2004 11:59 pm
- Location: One toke over the line...
Dan please keep posting. I for one find the pictures of your work fascinating and insightful. I think it gives all of us players a real appreciation for for the skill & knowledge required to do instrument repair & restoration right.
You know you really ought to get away from that lousy damp rain of the pacific northwest and relocate in the much more comfortable climate of the moderate midwest in Chicago.
Of course we suspect Harold would come and kidnap you back.
You know you really ought to get away from that lousy damp rain of the pacific northwest and relocate in the much more comfortable climate of the moderate midwest in Chicago.
Of course we suspect Harold would come and kidnap you back.
-
iiipopes

- Utility Infielder
- Posts: 8596
- Joined: Tue Sep 06, 2005 1:10 am
Knowledge is power. Please keep posting the pics. Then when us mere mortals go and purchase an instrument, we will know what to look for in good workmanship, and maybe over time (I know, this next comment is in the same category as whirled peas) we can exert pressure on the mainline instrument makers as we won't settle for, less than good workmanship, (I know, I stopped, then added the phrase instead of the word I really wanted to use) and raise the overall level of quality of instruments.
We will also know what is realistic, and see as well as know that good quality is not cheap, and I, for one, will save a few more $$ before I go shopping for another horn.
We will also know what is realistic, and see as well as know that good quality is not cheap, and I, for one, will save a few more $$ before I go shopping for another horn.
Jupiter JTU1110
"Real" Conn 36K
"Real" Conn 36K
-
Daniel C. Oberloh
- pro musician
- Posts: 547
- Joined: Fri Mar 19, 2004 9:22 pm
- Location: Seattle Washington
Thanks guys for the kind words. I will try to stay on top of collecting images to show, as I perform the tasks.
No josh, I don't think I am old, but my jokes are. I would probably be classified as recently becoming middle aged. I am lucky that I started my training when I was a teenager, It gave me a head start and extra years to build up my skills. My Dad, who I miss greatly, was a man of many skills who spent a good deal of time helping me develop my working skills. I have to admit Mom was not pleased to come home and find Dad teaching me how to solder with a torch on the dining room table.
Thanks for the offer but like harold said "the rain, and the moss and the mold".... ahh. I was born in Minnesota, grew up on navy bases all over the country and found the Pacific North West the place that suits me best. I would miss the winters where we go for weeks with out seeing the sun. I have lived here for thirty years and to quote the bare naked ladys " all my stuff is here anyway"
Daniel C. Oberloh
You're a master, and I hope you're not old.
No josh, I don't think I am old, but my jokes are.
You know you really ought to get away from that lousy damp rain of the pacific northwest and relocate in the much more comfortable climate of the moderate midwest in Chicago.
Thanks for the offer but like harold said "the rain, and the moss and the mold".... ahh. I was born in Minnesota, grew up on navy bases all over the country and found the Pacific North West the place that suits me best. I would miss the winters where we go for weeks with out seeing the sun. I have lived here for thirty years and to quote the bare naked ladys " all my stuff is here anyway"
Daniel C. Oberloh
-
Daniel C. Oberloh
- pro musician
- Posts: 547
- Joined: Fri Mar 19, 2004 9:22 pm
- Location: Seattle Washington
Hey Bloke,When you're beginning to settle into ol--...ahem...approaching middle age fartdom, you've developed (and continue to develop) a set of skills, a set of preferred activities, a set of clientele, and everyone knows where you are, moving completely out of one's base region just seems more of a nuisance than anything.
Yeah, mostly. but I really do like it here, the people are fine and the environment suits me. I get a lot of work from outside the state, so people finding me is not always so much an issue. I do hope to move my shop in the next few years to a better location on the other side of the city. I am not doing it so much for business reasons as much as for comfort and convenience for myself.
Daniel C. Oberloh
-
trseaman

- 4 valves
- Posts: 696
- Joined: Mon Jul 26, 2004 8:26 pm
- Location: Broken Arrow, OK
Don't forget the three months of sunshine! I lived in Portland, OR for many years and also visited Seatle a few times. The entire Pacific NW is a wonderful place to live. Regretfully I wasn't playing tuba during those years and didn't know about Mr. Oberloh and his crew... It would have been a pleasure to see your work first hand! Most of us only dream of having our horns fixed up that pretty! The whole "eye candy" thing has got me hooked! Keep it up, please...harold wrote:Perhaps this is the only reason I live in the Pacific Northwest, well that and the rain, and the moss and the mold.
Tim
-
Daniel C. Oberloh
- pro musician
- Posts: 547
- Joined: Fri Mar 19, 2004 9:22 pm
- Location: Seattle Washington
Well, I guess Dave has been patient so its time to add to this thread. I have been working on a number of valve assemblies and his 345 along with Dales are back on the bench. My assistant Tech, Stevo has been cleaning up Dale's slides and valve branches, getting them ready for assembly while I have been working on the machine work for Dave's valve casings and pistons. Because of those who sent there private messages in addition to those on this thread encouraging me to continue posting images, here is the latest installment.
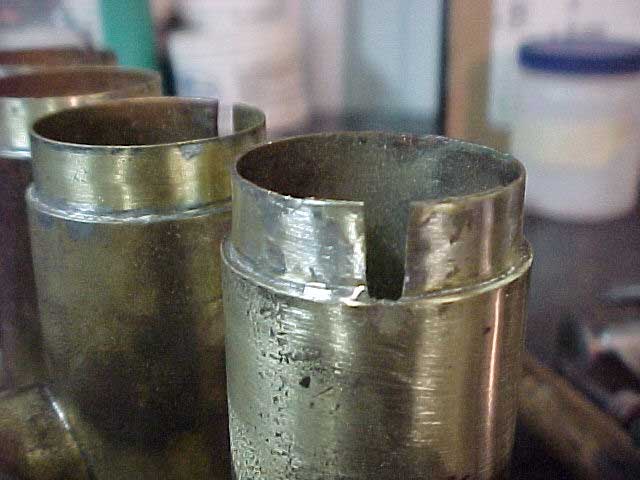
The casing top threads were quite worn and cracking. In some areas, chunks of brass were missing all together. The guide-way at the top of the first valve casing was also badly damaged. Because of the overall expense involved in such a project and the owners interest in the long-term viability of the horn, it was necessary to address these serious problems before moving forward with the project.
Threads removed, the tops of the casings are ready to be repaired as needed before the new threads can be installed.
The top of the guide-way, chipped away, it will cause problems with the new nylon guides to be installed so it needs to be corrected.
The corroded and thinned spots are cut away to allow for new brass to be fitted and silver-brazed in place.
New metal brazed in place, a little shaping on the proper size mandrel and the excess brass will be cut out of the guide way.
Ready for threads.
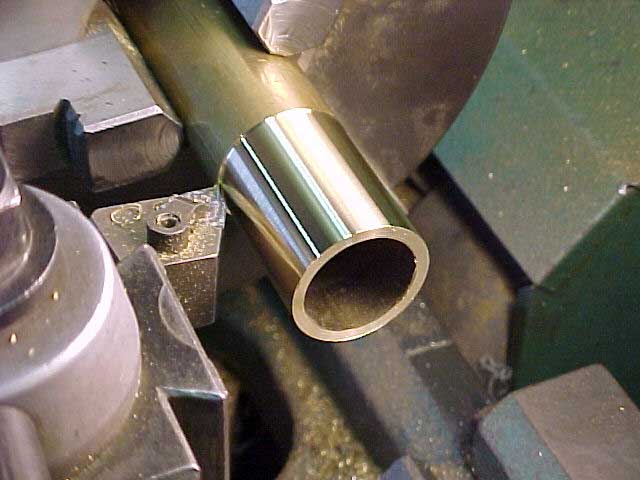
New threads are cut from heavy brass pipe.

After "Single point" cutting the treads to a custom fit with a specific cap, the inside is cut to fit snug on the casing.
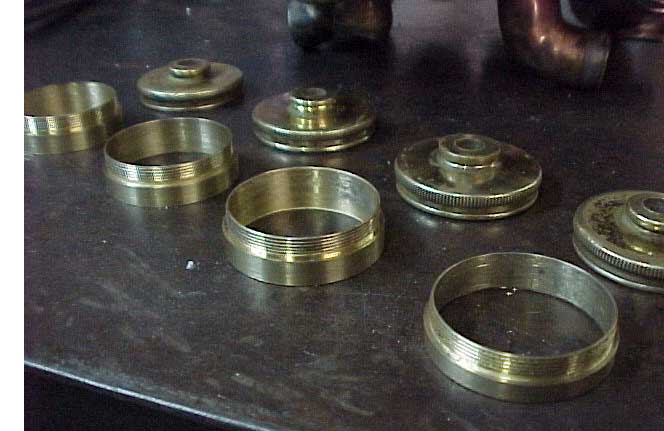
Ready to install. But first, I will complete the other repairs such as dents and holes in the valve casing ports and clean up the rest of the pitting and scratches.

Soldered in place, I can now turn my attention to the cylinder honing and finish up the plating and final fit of the pistons.
Sorry for the length, I actually did edit this down quite a bit. I will add to this if you all are not getting to bored with it yet. I look forward to your feedback.
Daniel C. Oberloh
Oberloh Woodwind and Brass Works
Seattle, WA
206.241.5767
www.oberloh.com
The casing top threads were quite worn and cracking. In some areas, chunks of brass were missing all together. The guide-way at the top of the first valve casing was also badly damaged. Because of the overall expense involved in such a project and the owners interest in the long-term viability of the horn, it was necessary to address these serious problems before moving forward with the project.
Threads removed, the tops of the casings are ready to be repaired as needed before the new threads can be installed.
The top of the guide-way, chipped away, it will cause problems with the new nylon guides to be installed so it needs to be corrected.
The corroded and thinned spots are cut away to allow for new brass to be fitted and silver-brazed in place.
New metal brazed in place, a little shaping on the proper size mandrel and the excess brass will be cut out of the guide way.
Ready for threads.
New threads are cut from heavy brass pipe.
After "Single point" cutting the treads to a custom fit with a specific cap, the inside is cut to fit snug on the casing.
Ready to install. But first, I will complete the other repairs such as dents and holes in the valve casing ports and clean up the rest of the pitting and scratches.
Soldered in place, I can now turn my attention to the cylinder honing and finish up the plating and final fit of the pistons.
Sorry for the length, I actually did edit this down quite a bit. I will add to this if you all are not getting to bored with it yet. I look forward to your feedback.
Daniel C. Oberloh
Oberloh Woodwind and Brass Works
Seattle, WA
206.241.5767
www.oberloh.com
-
Bandmaster
- 4 valves
- Posts: 778
- Joined: Sat May 15, 2004 3:33 am
- Location: Upland, CA
- Contact:
DON'T BE SORRY! Post MORE information, WE ARE NOT BORED!! (At least I'm not... it's MY tuba!)Daniel C. Oberloh wrote:Sorry for the length, I actually did edit this down quite a bit. I will add to this if you all are not getting to bored with it yet. I look forward to your feedback.
How the heck do you silver-braze brass such a small piece of brass? Talent and lots of practice.... that's how! I didn't know the casings were in that bad a shape, I knew the threads were bunged up, but now they look a whole lot better. I can't wait to get this horn back.... and now I can see the light at the end of the tunnel. Thanks Dan!
Dave Schaafsma
1966 Holton 345 | 1955 York-Master | 1939 York 716 | 1940 York 702 | 1968 Besson 226 | 1962 Miraphone 186 | 1967 Olds | 1923 Keefer EEb | 1895 Conn Eb | 1927 Conn 38K | 1919 Martin Helicon
1966 Holton 345 | 1955 York-Master | 1939 York 716 | 1940 York 702 | 1968 Besson 226 | 1962 Miraphone 186 | 1967 Olds | 1923 Keefer EEb | 1895 Conn Eb | 1927 Conn 38K | 1919 Martin Helicon
-
pulseczar
- 3 valves

- Posts: 435
- Joined: Tue Sep 27, 2005 2:03 am
That's some incredible work you do there Dan.
I was going through your valve rebuild pics and I saw some interesting tools that I'd to ask questions about.
1. the machine with all the oil. Is that what you use to lap horns?
2. do you do some plating at your shop?
3. Near the end of the pic set you close the vale around this huge machine thing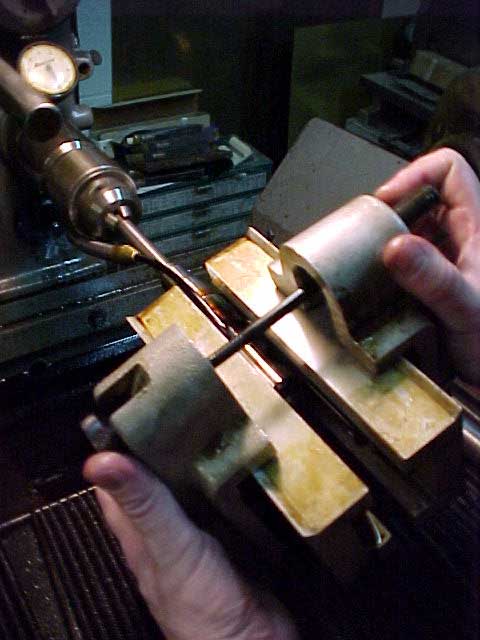
What's that used for? My wild guess would be that its similar to a collet, but I'm not sure.
[edit]
Never mind I think I get it now. So first you had the piston copper plated and then you used the tool thing to grind it down to fit the valve casing and then lapped it. Then you got it nickel plated then did the same procedure again. Is that right?
-
Bandmaster
- 4 valves
- Posts: 778
- Joined: Sat May 15, 2004 3:33 am
- Location: Upland, CA
- Contact:
It may have looked like hell and had lots of patches, but it still sounded good! That's main reason I choose to restore it.harold wrote:I think it is pretty impressive! Well, at least the part about calling that POS a tuba.Bandmaster wrote:(At least I'm not... it's MY tuba!)
Yeah, but I also paid about $2,000 less for it than the cheapest 345 I have found for sale, then or since.harold wrote:I looked at the bell the other day and was incredibly impressed with the about of original metal that was missing - it is nearly as spectacular as the number and size of the patches on the bell.
Well, Dan said he could repair it, so I'll take his word for it. It wouldn't be cheap, but he could repair it.harold wrote:In my humble opinion, the bell on that horn is so trashed, that Oberlohing it isn't even a reasonable possibility.
Yep, he made my day when he offered to sell it to me...harold wrote:Fortunately thanks to DP, a brilliant new bell is available to make it perfect again.
Yes, please...harold wrote:Dan, put some photos of the bell on this thread.
Dave Schaafsma
1966 Holton 345 | 1955 York-Master | 1939 York 716 | 1940 York 702 | 1968 Besson 226 | 1962 Miraphone 186 | 1967 Olds | 1923 Keefer EEb | 1895 Conn Eb | 1927 Conn 38K | 1919 Martin Helicon
1966 Holton 345 | 1955 York-Master | 1939 York 716 | 1940 York 702 | 1968 Besson 226 | 1962 Miraphone 186 | 1967 Olds | 1923 Keefer EEb | 1895 Conn Eb | 1927 Conn 38K | 1919 Martin Helicon