making tuning slides faster
-
iiipopes

- Utility Infielder

- Posts: 8596
- Joined: Tue Sep 06, 2005 1:10 am
-
iiipopes
- Utility Infielder
- Posts: 8596
- Joined: Tue Sep 06, 2005 1:10 am
Nope. Either have your tech do the whole thing right with the receiver and the slides, or leave it completely alone and get a small shank mouthpiece instead. Wick and PT make good mouthpieces with the smaller shank, or retire the horn and buy a older Besson that does the compensating for you.Bob1062 wrote:So, there's nothing I can do to make it any better?
Jupiter JTU1110
"Real" Conn 36K
"Real" Conn 36K
-
Daniel C. Oberloh

- pro musician

- Posts: 547
- Joined: Fri Mar 19, 2004 9:22 pm
- Location: Seattle Washington
If you are looking to have slides that are slick and easy to manipulate on the fly? Not really. The slide tubes must be level and parallel, within .001'' or so and they must be absolutely round. Bloke is very correct, no sanding.Bob1062 wrote:
So, there's nothing I can do to make it any better?
Some of the slides are working decent-ish after greasing them up for a few days, but still....
Daniel C. Oberloh
Oberloh Woodwind and Brass Works
www.oberloh.com
-
windshieldbug

- Once got the "hand" as a cue
- Posts: 11518
- Joined: Tue Mar 01, 2005 4:41 pm
- Location: 8vb
Don't know what Eb you have, and piston or rotary, but you may need some venting. Air seal can hold valve slides back, too.
 DO NOT EVEN CONSIDER DOING THIS AT HOME, FOR EITHER TYPE OF VALVE, CONSIDERING YOUR CUMULATIVE SUCCESS RATE THUS FAR!!!
Instead of talking to your plants, if you yelled at them would they still grow, but only to be troubled and insecure?
-
UTTuba_09

- bugler

- Posts: 194
- Joined: Tue Jun 27, 2006 3:56 pm
- Location: Knoxville, TN
- Contact:
I always recommend regular old veggie oil on my slides...
Cheers!
Cheers!
Eric Hamilton
University of Tennessee/Knoxville
Performance Major
Kalison Daryl Smith CC
Yamaha YEB-321 Eb
UT Symphony/Wind Ensemble
http://www.hammytuba.com/
University of Tennessee/Knoxville
Performance Major
Kalison Daryl Smith CC
Yamaha YEB-321 Eb
UT Symphony/Wind Ensemble
http://www.hammytuba.com/
-
Chuck(G)

- 6 valves
- Posts: 5679
- Joined: Fri Mar 19, 2004 12:48 am
- Location: Not out of the woods yet.
- Contact:
Here's a suggestion that might at least ameliorate the damage--at worst, it won't harm anything. Get some 000 steel wool and polish the slides--this stuff is too fine to scratch or remove material, but it will burnish out some of the unevenness. Clean everything up carefully-- get every last bit of steel wool and leftover sandpaper grit and dirt out of your slides and lubricate.
But Joe's right--the usual cause of slow slides isn't surface imperfections or too-tight fit, but misalignment. You can check this for yourself by inserting only one leg of a slide and judging the fit. I'll wager that it's pretty free.
When there's misalignment, the legs of the inner slide have to bend to fit. This is what slows things down.
Good luck!
-
Allen
- 3 valves

- Posts: 404
- Joined: Fri Mar 19, 2004 12:29 am
- Location: Boston MA area
The only slide that I need to adjust while playing my five rotary valve CC tuba is the first valve slide. Initially, the first valve slide was too hard to move easily. My solution was to take the horn to one of the top brass repair techs in the Boston area and ask him to make it work better, and also to vent the first valve. [Jim Becker at Osmun Music -- link in the Shops section of TubeNet] Jim lapped the slide (it was already in good alignment) and vented the valve. Also, without being asked, he put some bumpers (rubber O rings) to prevent a clacking sound when the slide is pushed all the way in, and put on a light cord to prevent the slide from coming out (without undoing the cord). Cost: $75. Workmanship: perfection.
I have mixed lighter and heavier lubricants for this slide until it moves with just the amount of resistance that I like.
If your tuba was cheap, or even free, spending less than $100 so that it is just the way you like it is more than worth while. I don't compare repair or modification costs with what a horn costs. I compare these costs with what it's worth for me.
Regarding that $350 Eb tuba I described in another thread: I am probably going to spend perhaps $100 to $150 on it. I'm sure that I will be happier than if I had bought a $450 to $500 tuba instead. Further, I am of the opinion that a good tech is cheaper in the long run than ones who are more known for their low prices than their excellence.
Cheers,
Allen
-
Rick Denney

- Resident Genius
- Posts: 6650
- Joined: Mon Mar 22, 2004 1:18 am
- Contact:
Chuck, I wouldn't use steel wool. Some of the steel fibers will embed themselve into the brass, defying any subsequent cleaning. Steel wools is really only good for rubbing on iron/steel or harder surfaces.Chuck(G) wrote:Here's a suggestion that might at least ameliorate the damage--at worst, it won't harm anything. Get some 000 steel wool and polish the slides--this stuff is too fine to scratch or remove material, but it will burnish out some of the unevenness. Clean everything up carefully-- get every last bit of steel wool and leftover sandpaper grit and dirt out of your slides and lubricate.
Instead, use the finest Scotchbrite pads if you want to go that way. But I wouldn't even do that. I'd use 1000 emery cloth, very lightly and just enough to shine it up a bit. This is strictly a damage-control measure.
There is no shortcut. To make a slide that the movement is controlled by the lubricant viscosity and not by friction, the tubes have to be round, straight, and parallel, as Dan says, within a thousandth.
But you can get a usably moveable slide at a lower standard than that. Check for roundness and straightness by:
1. Do your damage control with 1000-grit emery cloth.
2. Clean both inner and outer slides very thoroughly to remove all traces of grit, dirt, and old grease. You'll need a degreaser, cheesecloth, a cleaning rod, followed by dish soap and water.
3. Apply light oil to the slide. The lighter the better. Valve oil works for this.
4. Insert each leg into the outer slide separately. If there is any binding with a straight insertion, either the inner or outer tube is not straight. You can't fix this without very good skills and tools, so don't even try.
5. If it inserts without any binding or increase in friction, try turning it after full insertion. If there is any binding on turning, then either the inner or outer slide is not round, or there is a dent that you have missed. Again, you can't fix this without very good skills and tools, so don't even try.
6. If you can insert and turn each leg reasonably, then lay the slide down on a hard, flat surface. A polished stone counter top works pretty well--if your reflection has no waviness or distortion, it's flat enough. Let the crook hang out over the edge so that it's just the inner tubes laying on the counter top. If the tubes rock on the stone, then the two slides don't lie in the same plane. They must do that first. You can adjust this with your hands by applying very gentle pressure and then checking it again. If you go too far, you'll kink the crook and then the technician you take it to will laugh at you and charge you much more to repair it, so this is a risk and you should know it. This won't work with slides that have a cross brace--period.
7. Once the inner tubes are in the same plane, get a caliper (a good one) and measure them near the tip and near the crook. The measurements must be identical. If you can't make those measurements identical while still maintain an exact match of the tips of the inners with the openings in the outers, then it's too much to make it work, and you're back to needing even more special skills and tools.
8. Test again. If the slide still binds, the outers are probably not aligned. That requires a more complicated repair.
Techs will remove the inner tubes, chuck them up on an exact-fit steel dowel jig in a lathe, and check them for roundness and straightness separately. They may use a steel dowel to check the straightness of the outer slide. Then, they jig the slide up on a stone bench and adjust the position of the inners by melting the solder and letting the slide relax in the jig. It's the same with the outers, though they may adjust and test rather than using a jig. If the other tubes are not round and straight, they will remove them and straigten them as with the inners. As you can see, doing it right requires advanced tools and skills.
My bet is that after your sanding experiment, no further lapping is required. In fact, you'll probably find that the slide falls out by itself if you get things really straight, because the sanding removed too much material.
But I have been able to make slides work reasonably well using my steps. Not perfect, mind you, but reasonable.
I followed these steps on the Missenharter, which I have named Solder Practice (second from right in this picture):
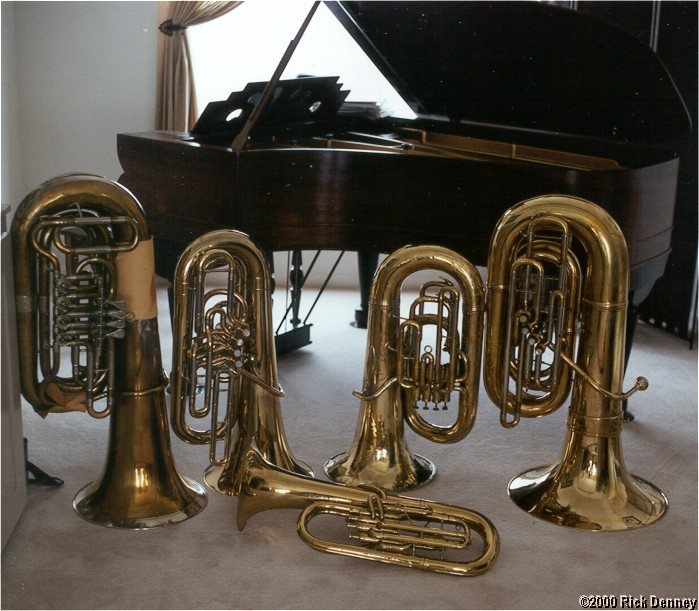
Rick "who would never do this on an instrument of any real value, including any of the other tubas in the photo" Denney
-
Chuck(G)
- 6 valves
- Posts: 5679
- Joined: Fri Mar 19, 2004 12:48 am
- Location: Not out of the woods yet.
- Contact:
No Rick, emery or Scotchbrite will just remove more material. You want to burnish what's there, not remove it. 000 and 0000 is used all of the time to polish varnished wood surfaces without damaging them--and wood's a LOT softer than brass. It's extremely fine stuff.Rick Denney wrote:Chuck, I wouldn't use steel wool. Some of the steel fibers will embed themselve into the brass, defying any subsequent cleaning. Steel wools is really only good for rubbing on iron/steel or harder surfaces.
If you're really worried about steel (which I'm not), you can use bronze wool (available from some paint stores), but it does a much inferior job of burnishing, IMOHO.
A repair tech will use rouge to polish--again, it doesn't remove a bunch of material like an abrasive (although it does remove some material or else you'd be stuck with solder stains forever), but does tend to burnish things as it works.
-
Rick Denney
- Resident Genius
- Posts: 6650
- Joined: Mon Mar 22, 2004 1:18 am
- Contact:
Yes, I have a pile of it. I think I'd sooner use it on varnish, which is so soft the fibers are easy to wipe out of it.Chuck(G) wrote:No Rick, emery or Scotchbrite will just remove more material. You want to burnish what's there, not remove it. 000 and 0000 is used all of the time to polish varnished wood surfaces without damaging them--and wood's a LOT softer than brass. It's extremely fine stuff.
As far as it burnishing and not removing, I guess I don't buy it completely. Every time I use it for polishing anything, it loads up, so I figure it's removing something. Probably not enough to worry about.
I once used it to polish aluminum bike parts, and the result was that even after a careful cleaning, the parts ended up with unsightly rust spots where the embedded fibers rusted. That's the reason for my caution. I've seen people use it on antique brass, but not for stuff that's going to spend it's life being moist, so maybe my experience doesn't transfer.
It's like magic on chrome-plated surfaces, taking dirt and corrosion off with little effort required.
Rick "thinking that working the inner tubes inside the outer tubes vigorously will also burnish the surfaces" Denney
-
Art Hovey

- pro musician
- Posts: 1508
- Joined: Sun May 02, 2004 12:28 am
- Location: Connecticut
It really isn't rocket surgery. First, everyone is correct about the importance of alignment. The next step that works for me is to wipe off all of the slide grease and go over the inner slide tubes with a magic marker. Then I insert the slide and move it in and out a few times to see where the ink is removed by friction. Then I remove some metal from those areas with emory cloth, and polish it with steel wool. (I have not run into the problem that Rick mentioned.) Keep repeating that process until the slide moves with a reasonable amount of friction. Just be careful not to remove too much metal near the ends. You want a good seal there, as on a trombone slide. Naturally, you don't want to try this on a very valuable instrument until you have had some practice on junkers.
-
Chuck(G)
- 6 valves
- Posts: 5679
- Joined: Fri Mar 19, 2004 12:48 am
- Location: Not out of the woods yet.
- Contact:
Rick, I'd hate to think I was giving folks bad advice, so I'd like to see if burnishing with fine steel wool leaves bits of iron embedded in the brass.
How about an experiment? I've got loads of C330 brass sheet to try this on.
Why don't I scuff up a piece with 320 grit emery paper, then burnish one half of it with 000 steel wool, to the point where it's nice and shiny.
Then rinse with some dilute muriatic acid and let dry for a day.
The result should be a more-or-less uniformly green coating, with any steel showing as relatively obvious rust spots.
How does that sound?
-
Rick F
- 5 valves

- Posts: 1679
- Joined: Thu Mar 18, 2004 11:47 pm
- Location: Lake Worth, FL
I'm watching this thread with much interest!! I've used '000' steel wool a few times on the inside of my slides—although sparingly (twice in 5 yrs). I always rinse thoroughly and then polish them before applying grease. I'd like to see the results of this test. I consider both Chuck and Rick experts here.Chuck(G) wrote:Rick, I'd hate to think I was giving folks bad advice, so I'd like to see if burnishing with fine steel wool leaves bits of iron embedded in the brass.
How about an experiment? I've got loads of C330 brass sheet to try this on.
Why don't I scuff up a piece with 320 grit emery paper, then burnish one half of it with 000 steel wool, to the point where it's nice and shiny.
Then rinse with some dilute muriatic acid and let dry for a day.
The result should be a more-or-less uniformly green coating, with any steel showing as relatively obvious rust spots.
How does that sound?
Miraphone 5050 - Warburton BJ/RF mpc
YEP-641S (recently sold), DE mpc (102 rim; I-cup; I-9 shank)
Symphonic Band of the Palm Beaches:
"Always play with a good tone, never louder than lovely, never softer than supported." - author unknown.
YEP-641S (recently sold), DE mpc (102 rim; I-cup; I-9 shank)
Symphonic Band of the Palm Beaches:
"Always play with a good tone, never louder than lovely, never softer than supported." - author unknown.
-
Chuck(G)
- 6 valves
- Posts: 5679
- Joined: Fri Mar 19, 2004 12:48 am
- Location: Not out of the woods yet.
- Contact:
-
Chuck(G)
- 6 valves
- Posts: 5679
- Joined: Fri Mar 19, 2004 12:48 am
- Location: Not out of the woods yet.
- Contact:
You been talking to some of the folks who bring horns in here for repair, Wade? I just pulled the garland off of a 186 bell and found under it (other than the usual solder):the elephant wrote:Just unload a nostril or two on the slide. Or spit on it. Those both work real good.
- Beeswax
- Elmer's glue (or white glue of some kind)
- Silicone caulk
- Contact cement
Silly people--don't they know they're supposed to use Pro-Bond to stop rattles?
-
windshieldbug
- Once got the "hand" as a cue
- Posts: 11518
- Joined: Tue Mar 01, 2005 4:41 pm
- Location: 8vb
You didn't look hard enough! I put rosin and Nuskin in there, too!Chuck(G) wrote:I was surprised not to have found bubble gum.
- Beeswax
- Elmer's glue (or white glue of some kind)
- Silicone caulk
- Contact cement
Instead of talking to your plants, if you yelled at them would they still grow, but only to be troubled and insecure?
-
glangfur
- bugler
- Posts: 151
- Joined: Mon Apr 12, 2004 3:33 pm
- Location: Boston, MA
Aside from lapping compounds, the polishing paper we use at the Shires trombone factory is MicroMesh: http://www.rockler.com/product.cfm?page=9930
1500 grit is good for taking off a very, very small amount of material, and might undo some of the damage Bob did with the 400 grit sandpaper. 2400 grit is excellent for polishing metal while taking off only the tiniest bit of the surface, if any at all. It will remove built up corrosion without damaging the metal underneath.
1500 grit is good for taking off a very, very small amount of material, and might undo some of the damage Bob did with the 400 grit sandpaper. 2400 grit is excellent for polishing metal while taking off only the tiniest bit of the surface, if any at all. It will remove built up corrosion without damaging the metal underneath.
Gabe Langfur
Bass Trombonist
Rhode Island Philharmonic
Vermont Sympony
Lecturer of Bass Trombone, Boston University
Guest Artist/Teacher in Trombone, U of RI
S. E. Shires Co.
gabe@seshires.com" target="_blank" target="_blank
Bass Trombonist
Rhode Island Philharmonic
Vermont Sympony
Lecturer of Bass Trombone, Boston University
Guest Artist/Teacher in Trombone, U of RI
S. E. Shires Co.
gabe@seshires.com" target="_blank" target="_blank
-
Rick Denney
- Resident Genius
- Posts: 6650
- Joined: Mon Mar 22, 2004 1:18 am
- Contact:
It sounds like I'm going to get shown up, heh, heh.Chuck(G) wrote:The result should be a more-or-less uniformly green coating, with any steel showing as relatively obvious rust spots.
How does that sound?
If you and Art haven't had the problem, then my caution is probably unfounded. The problem I had was not with brass, but with aluminum.
Rick "who avoids picking fights on such things with Chuck" Denney
-
Rick Denney
- Resident Genius
- Posts: 6650
- Joined: Mon Mar 22, 2004 1:18 am
- Contact:
Oh, now you are just fattening me up for the kill.Chuck(G) wrote:Not me--I'm just "insane". Denney's the "resident genius". At any rate, I've got some time to try the experiment this week, unless Rick has a better suggestion.Rick F wrote: I consider both Chuck and Rick experts here.
Rick "bending over" Denney