Ok, I have been thinking about ways to alter the location of the finger button on the 4th valve of my e flat piston tuba...
Has anyone ever tried removing the 4th valve finger button on a piston tuba and installing some type of lever (similar to a 4th valve euphonium slide lock) and using a set screw to secure it directly into the piston stem? Of course, some sort of mount would have to be made to accommodate the felt, but ideally I would love to have something that I could alter the lateral movement (like a clock hour/minute hand) and also possibly the height. I was hoping that by securing it directly to the stem of the piston, I could maintain proper valve movement. Any thoughts? Obviously weight would also become a contributing factor. I have thought about lighter stems and buttons and springs, but since the majority of the weight is the piston itself, I am hoping to find/create an adjustable apparatus that could fit any tuba with similar threads (or just use a different screw for others).
Fire away...
4th valve finger button creativity
-
Eflatdoubler
- bugler

- Posts: 216
- Joined: Thu Nov 05, 2009 2:00 am
-
Art Hovey

- pro musician

- Posts: 1508
- Joined: Sun May 02, 2004 12:28 am
- Location: Connecticut
Re: 4th valve finger button creativity
You mean like this?
http://www.galvanizedjazz.com/tuba/valv ... nders.html
They work, but they do tend to wear out valve guides more quickly.
http://www.galvanizedjazz.com/tuba/valv ... nders.html
They work, but they do tend to wear out valve guides more quickly.
-
Eflatdoubler
- bugler
- Posts: 216
- Joined: Thu Nov 05, 2009 2:00 am
Re: 4th valve finger button creativity
thanks- that looks great! I never even thought about keeping the actual button.
-
hbcrandy

- 4 valves

- Posts: 653
- Joined: Wed Apr 21, 2004 10:28 pm
- Location: Baltimore, Maryland USA
- Contact:
Re: 4th valve finger button creativity
A conversion I did years ago to a Yamaha, four piston valved, non-compensating Eb tuba was a tedious process but worked well. It involved using a motorcycle brake cable and the actual valve stem and button.
On a lathe, I threaded a piece of steel rod so that it would screw into the top of the piston, and brazed it to the end of the brake cable from which I removed the brake linkage attachment. I got hold of another Yamaha valve cap and made parts for it to hold one end of the brake cable sheath. I then built a contraption to be soldered onto to the tuba where I wanted the valve stem to be. This included another piece to hold the other end of the brake cable sheath that had been shortened to match the distance between the valve cap and the valve stem at the new location of the finger button and valve stem. On the valve stem side of the cable, I made and added a female thread to match the male thread on the bottom of the valve stem. On the new valve stem/finger button holder, I also added a booster spring to help the fourth valve to return once depressed. When finished, it was quite serviceable.
This was done in the late 1970's. I do NOT have photos of this project.
Randy Harrison
Proprietor,
Harrison Brass
Baltimore, Maryland USA
http://www.harrisonbrass.com
Instructor of Applied Brass Performance
Maryland Conservatory of Music
Bel Air and Havre de Grace, Maryland USA
http://www.musicismagic.com
Proprietor,
Harrison Brass
Baltimore, Maryland USA
http://www.harrisonbrass.com
Instructor of Applied Brass Performance
Maryland Conservatory of Music
Bel Air and Havre de Grace, Maryland USA
http://www.musicismagic.com
-
Eflatdoubler
- bugler
- Posts: 216
- Joined: Thu Nov 05, 2009 2:00 am
Re: 4th valve finger button creativity
Sounds interesting! I was about to ask for a photo until I read the last line 
I am wondering if I would get better results renaming this thread "valve button extenders" I would love to hear how some of our tuba technician wizards might solve this dilemma ! Joe, Matt Walters, Lee Stoefer, and of course any player that has given it a shot.
I am wondering if I would get better results renaming this thread "valve button extenders" I would love to hear how some of our tuba technician wizards might solve this dilemma ! Joe, Matt Walters, Lee Stoefer, and of course any player that has given it a shot.
-
Paul Scott

- pro musician
- Posts: 483
- Joined: Sat Mar 20, 2004 8:11 am
Re: 4th valve finger button creativity
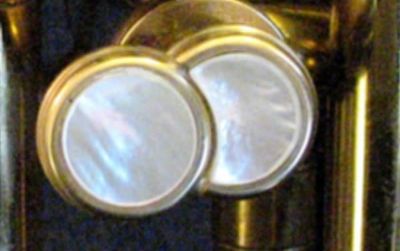
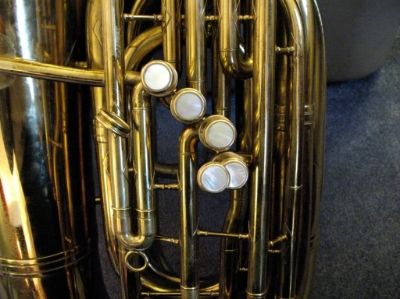
I had a problem reaching the fourth valve on one of my Martins so Martin Wilk created an extended button for me. I realize that this isn't exactly what you're looking for, (it's not adjustable at all) but I thought you might like to see it. The back of the button is solid in a "figure-8" design.
The action on it feels great and I've never had an issue with the piston hanging up.
The action on it feels great and I've never had an issue with the piston hanging up.


Adjunct Tuba Professor
William Paterson University
Wayne, NJ
William Paterson University
Wayne, NJ
-
Eflatdoubler
- bugler
- Posts: 216
- Joined: Thu Nov 05, 2009 2:00 am
Re: 4th valve finger button creativity
Beautifully done! My main reason for wanting the adjustments from left to right and in height would be more to put something together that any player could use and fine tune with out even needing to go to a shop.
It is nice to see other variations on how to tackle the same problem.
It is nice to see other variations on how to tackle the same problem.